Friday, May 3, 2024
Home Blog Page 79

HOW TO SECURE IOT DEVICES WITH PENETRATION TESTING

0
Cybersecurity1
Cybersecurity1

IoT

In the Internet of Things (IoT) settings, objects are linked on a network to share data, but a number of these IoT systems are built and implemented with inadequate security in mind. Consequently, these systems have increasingly become a target of various attacks. An effective solution for guaranteeing the security and safety of a network system is through penetration testing.

In general, penetration testing is implemented to identify the vulnerabilities or potential attacks on traditional systems. A quick fix of these vulnerabilities can mitigate future attacks. However, IoT penetration testing is far from being a wide practice. IoT penetration testing aims to uncover all viable methods an attacker can employ to breach the target system through target-graphs.

By implementing a layered methodology, where every single layer is evaluated, penetration testers can identify vulnerabilities that may have been overlooked. The benefits of penetration testing for IoT systems are numerous. IoT pen-tests reduce the risk of compromise, fortify device security, promote better user and data privacy, safeguards against unauthorized usage, and set strong encryption to prevent man-in-the-middle (MTM) attacks prevents Elevation of Privileges.

What Are the Attack Surface Areas of IoT?

An IoT attack surface is the combination of all prospective security weaknesses in IoT devices and related systems. The following are the IoT attack surface areas:

Applications, Firmware, and Software

The Vulnerabilities present in web-based applications and other associated software for IoT systems can result in compromised systems. For instance, web applications can be manipulated to boost malicious firmware updates or steal sensitive user credentials.

Embedded Devices

Attackers usually use devices as their central approach for launching attacks. Embedded devices in IoT systems can be employed for various functions depending on the user case scenario. Some parts of a device are vulnerable to attacks, including network services, firmware, memory, web interface, and physical interface.

Malicious actors can also exploit other vulnerabilities like outdated components, unsecured default settings, and unsecured update mechanisms. Some vulnerabilities found with embedded devices include

  • Insecure authentication system employed in serial ports
  • Exposed serial ports
  • Power analysis and side channel-based attacks
  • External media-based attacks

Communication Channels

Likewise, attacks can start in the channels that link the IoT components together. Several different radio communications protocols can be employed, including Wi-Fi, cellular, BLE, wave, etc. Also, IoT devices can be prone to known network attacks and vulnerabilities present in communication channels, including:

  • Spoofing
  • Jamming-based attacks
  • Denial of Service (DoS) attacks
  • Man-in-the-middle attacks
  • Live radio communication interception and modification
  • Replay-based attacks

If you have only been working in flat networks, EC-Council’s Certified Penetration Testing Professional or CPENT training program will help you take your skills to the next level by teaching you to pen-test IoT systems and OT systems, among others.

Common Attacks in IoT Systems

The following are the most common attacks in IoT systems hat organizations need to design a comprehensive approach to cybersecurity to protect themselves from known and unknown attacks:

  • Ransomware
  • Botnets
  • Advanced persistent threats
  • Denial of service (DoS) attacks and Distributed Denial of Service (DDoS) attacks
  • Identity and data theft
  • Spamming and phishing
  • Man-in-the-Middle attacks
  • Social engineering attacks
  • Remote recording

How to Secure the IoT?

Given that any part of the IoT system can be compromised, you must prioritize developing and maintaining secured IoT systems. Notwithstanding your organization’s size, security measures should be implemented from the design phase to incorporate it into every part of the system.

Physical Security Is Crucial

You probably don’t consider physical security when thinking about IoT pentesting. However, physical security is your first line of defense against potential security attacks. Thus, you should ensure that each of your physical assets is properly secured. Penetration testers should conduct expert social engineering and physical security tests to detect vulnerabilities that organizations may have ignored.

Threat Modeling

It is an open secret that IoT devices usually fall behind when it comes to information and data security. This is why you need to incorporate threat modeling processes during your IoT pentesting. The basic threats you’ll encounter and mitigate in an architecturally-centric threat modeling are Denial of Service, denial hijack, action spoofing, faking the data source, and alteration of installed BIOS, among others.

Hardware and Firmware-Focused Security Solutions

One way or the other you’ll get the firmware. Firmware can be decompiled and assessed dynamically or manually to gain critical insights into the device’s nature. When this is accompanied by penetration testing, the information gathered may offer active insights that can help the pentester locate a bug in the code. Some of the widespread bugs to search for on hardware devices include

  • Abuse of diagnostic utilities (e.g. tcpdump)
  • Absence of hardware correct device hardening
  • CLI injection
  • Absence of appropriate user rights assignments
  • Initial boot-up: if the device has a recovery code or if it’s possible to disrupt the initial boot up.
  • Web-based: Forced browsing/XSS/SSRF/CSRF
  • Inappropriate handling and delegation of default admin/root credentials

Spend just 40-hours and align your career to the growing demand for Penetration testers! Enroll for the CPENT to learn more about the most significant advanced penetration testing tools, methodologies, and techniques today.

The Need for IoT Penetration Testing

IoT pentesting evaluates and exploits numerous components available in an IoT device solution to render the device more secure. An IoT pentesting usually begins with mapping the whole attack surface of the solution. This is supported by pinpointing vulnerabilities and executing exploitation, which is later accompanied by post-exploitation. The IoT pentesting process is then completed with a detailed technical report.

According to Gartner, about 20 billion IoT devices will be available by 2020. This does not include “general purpose” devices such as smartphones, but rather committed, physical items that include embedded technology to detect or interact with the external environment or their internal state. Given the rise in IoT systems, there are endless possibilities for IoT usages. You can save energy, time, money, and even lives using IoT systems.

However, the flip side of IoT is that it isn’t built with a focus on security, making it highly risky. Pentesting your IoT devices might be the assurance you need. Having a CPENT means that you have an expert who will test your IoT devices and come up with different approaches that a malicious actor can exploit and mitigate them in advance. Likewise, considering that all IoT is different, CPENTs are able to execute thorough and advanced IoT pen-tests to secure your organization.

Which Certification Is Best for Penetration Testing?

Penetration testing jobs are one of the most attractive professions today. This is heightened by the plethora of cyberattacks and the need to test the organization’s systems against the techniques implemented during cyber-attacks by malicious actors. Some of the best penetration testing online certifications include:

EC-Council Certified Penetration Testing Professional (CPENT) Program

The EC-Council’s Certified Penetration tester (CPENT) program gives you the hands-on training you need to know how to execute an efficient penetration test in an enterprise network environment that must be evaded, attacked, defended, and exploited. Likewise, the CPENT Challenge Edition is an affordable learning resource that offers a refresher in subjects such as IoT, binary analysis, SCADA, and ICS. To get details on plans & pricing, enroll now.

EC-Council Licensed Penetration Tester (LPT) Master

The LPT (Master) certification program is the climax to EC-Council’s entire penetration testing training online. Beginning from the Certified Ethical Hacker Program (CEH) to the EC-Council Certified Security Analyst (ECSA) Program, LPT simulates a physical penetration test, accompanied by an additional report to the client. As part of the training process, you are required to execute a full black-box penetration test of a network provided by the EC-Council. For more information, click here.

FAQS

What Is IoT Penetration Testing?

An IoT penetration testing refers to evaluating and exploiting different components available in an IoT device infrastructure to make the device more safe and secure. What you’re doing during an IoT penetration testing is to test the IoT device’s security situation. Although, this would require that the Penetration tester has a proper understanding of the IoT architecture.

What Are Some of the Common Attacks in IoT Systems?

Organizations need to be conscious of the following attacks in IoT systems and use a comprehensive cybersecurity approach to protect themselves. Common attacks in IoT systems include ransomware, botnets, advanced persistent threats, denial of service (DoS) attacks, Distributed Denial of Service (DDoS) attacks, identity and data theft, spamming and phishing, Man-in-the-Middle attacks, Social engineering attacks, and Remote recording.

How Are IoT Devices Hacked?

IoT devices are hacked by malicious hackers who are actively trying to exploit the vulnerabilities within IoT security. Their intent is not to attack the systems themselves. Still, it serves as a starting point for all manner of malicious attacks, including advanced persistent threats, distributed denial-of-service (DDoS) attacks, malware, identity and data theft, social engineering attacks, phishing attacks, etc.

What Are the Top Attack Vectors for IoT Devices?

  • HVAC systems
  • Programmable logic controllers
  • Physical access control solutions
  • Network cameras
  • Picture archiving and communication systems
  • Radiotherapy systems
  • Network management cards
  • Out-of-band controllers
  • Radiology workstations
  • Wireless access points

creds: eccouncil

Bookmark
ClosePlease login

10+ penetration testing tools the pros use

0
CyberSecurity

Beginner looking to skill up? here’s where to start

What is penetration testing?

Penetration testing (or pentesting) is a simulated cyber attack where professional ethical hackers break into corporate networks to find weaknesses … before attackers do.

It’s like in the movie Sneakers, where hacker-consultants break into your corporate networks to find weaknesses before attackers do. It’s a simulated cyber attack where the pentester or ethical hacker uses the tools and techniques available to malicious hackers.

Why you need to do pentesting

Again, pentesting shows you where and how a malicious attacker might exploit your network.This allows you to mitigate any weaknesses before a real attack occurs.

According to recent research from Positive Technologies, pretty much every company has weaknesses that attackers can exploit. In 93% of cases, pentesters were able to breach the network perimeter and access the network. The average amount of time needed to do so was four days. At 71% of the companies, an unskilled hacker would have been able to penetrate the internal network.

Top pentesting tools

Back in ye olde days of yore, hacking was hard and required a lot of manual bit fiddling. Today, though, a full suite of automated testing tools turn hackers into cyborgs, computer-enhanced humans who can test far more than ever before.

Why use a horse and buggy to cross the country when you can fly in a jet plane? Here’s a list of the supersonic tools that make a modern pentester’s job faster, better, and smarter.

1. Kali Linux

If you’re not using Kali as your base pentesting operating system, you either have bleeding-edge knowledge and a specialized use case or you’re doing it wrong. Formerly known as BackTrack Linux and maintained by the good folks at Offensive Security (OffSec, the same folks who run the OSCP certification), Kali is optimized in every way for offensive use as a penetration tester.

While you can run Kali on its own hardware, it’s far more common to see pentesters using Kali virtual machines on OS X or Windows.

Kali ships with most of the tools mentioned here and is the default pentesting operating system for most use cases. Be warned, though–Kali is optimized for offense, not defense, and is easily exploited in turn. Don’t keep your super-duper extra secret files in your Kali VM.

2. nmap

The granddaddy of port scanners, nmap–short for network mapper–is a tried-and-true pen testing tool few can live without. What ports are open? What’s running on those ports? This is indispensable information for the pentester during recon phase, and nmap is often the best tool for the job.

Despite the occasional hysteria from a non-technical C-suite exec that some unknown party is port scanning the enterprise, nmap by itself is completely legal to use, and is akin to knocking on the front door of everyone in the neighborhood to see if someone is home.

Many legitimate organizations such as insurance agencies, internet cartographers like Shodan and Censys, and risk scorers like BitSight scan the entire IPv4 range regularly with specialized port-scanning software (usually nmap competitors masscan or zmap) to map the public security posture of enterprises both large and small. That said, attackers who mean malice also port scan, so it’s something to log for future reference.

3. Metasploit

Why exploit when you can meta-sploit? This appropriately named meta-software is like a crossbow: Aim at your target, pick your exploit, select a payload, and fire. Indispensable for most pentesters, metasploit automates vast amounts of previously tedious effort and is truly “the world’s most used penetration testing framework,” as its website trumpets. An open-source project with commercial support from Rapid7, Metasploit is a must-have for defenders to secure their systems from attackers.

4. Wireshark

Wireshark doo doo doo doo doo doo… now that we’ve hacked your brain to hum that tune (see how easy that engagement was?), this network protocol analyzer will be more memorable. Wireshark is the ubiquitous tool to understand the traffic passing across your network. While commonly used to drill down into your everyday TCP/IP connection issues, Wireshark supports analysis of hundreds of protocols including real-time analysis and decryption support for many of those protocols. If you’re new to pentesting, Wireshark is a must-learn tool.

5. John the Ripper

Unlike the software’s namesake, John doesn’t serially kill people in Victorian London, but instead will happily crack encryption as fast as your GPU can go. This password cracker is open-source and is meant for offline password cracking. John can use a word list of likely passwords and mutate them to replace “a” with “@” and “s” with “5” and so forth, or it can run for an infinity with muscular hardware until a password is found. Considering that the vast majority of people use short passwords of little complexity, John is frequently successful at breaking encryption.

6. Hashcat

The self-proclaimed “world’s fastest and most advanced password recovery utility” may not be modest, but the hashcat folks certainly know their worth. Hashcat gives John the Ripper a run for its money. It is the go-to pentesting tool to crack hashes, and hashcat supports many kinds of password-guessing brute force attacks, including dictionary and mask attacks.

Pentesting commonly involves exfiltration of hashed passwords, and exploiting those credentials means turning a program like hashcat loose on them offline in the hope of guessing or brute-forcing at least some of those passwords.

Hashcat runs best on a modern GPU (sorry, Kali VM users). Legacy hashcat still supports hash cracking on the CPU, but warns users it is significantly slower than harnessing your graphics card’s processing power.

7. Hydra

John the Ripper’s companion, Hydra, comes into play when you need to crack a password online, such as an SSH or FTP login, IMAP, IRC, RDP and many more. Point Hydra at the service you want to crack, pass it a word list if you like, and pull the trigger. Tools like Hydra are a reminder why rate-limiting password attempts and disconnecting users after a handful of login attempts can be successful defensive mitigations against attackers.

8. Burp Suite

No discussion of pentesting tools is complete without mentioning web vulnerability scanner Burp Suite, which, unlike other tools mentioned so far, is neither free nor libre, but an expensive tool used by the pros. While there is a Burp Suite community edition, it lacks much of the functionality, and the Burp Suite enterprise edition goes for a cool $3,999 a year (that psychological pricing doesn’t make it seem that much cheaper, guys).

There’s a reason they can get away with those kind of nosebleed prices, though. Burp Suite is an incredibly effective web vulnerability scanner. Point it at the web property you want to test, and fire when ready. Burp competitor Nessus offers a similarly effective (and similarly priced) product.

9. Zed Attack Proxy

Those without the cash to pay for a copy of Burp Suite will find OWASP’s Zed Attack Proxy (ZAP) to be almost as effective, and it is both free and libre software. Like the name suggests, ZAP sits between your browser and the website you’re testing and allows you to intercept (aka man in the middle) the traffic to inspect and modify. It lacks many of Burp’s bells and whistles, but its open-source license makes it easier and cheaper to deploy at scale, and it makes a fine beginner’s tool to learn how vulnerable web traffic really is. ZAP competitor Nikto offers a similar open-source tool.

10. sqlmap

Did somebody say SQL injection? Well hello, sqlmap. This incredibly effective SQL injection tool is open-source and “automates the process of detecting and exploiting SQL injection flaws and taking over of database servers,” just like its website says. Sqlmap supports all the usual targets, including MySQL, Oracle, PostgreSQL, Microsoft SQL Server, Microsoft Access, IBM DB2, SQLite, Firebird, Sybase, SAP MaxDB, Informix, HSQLDB and H2. Old-timers used to have to craft their SQL injection with a hot needle to their hard drive. These days sqlmap will take the squinty-eyed work out of your pen-testing gig.

11. aircrack-ng

Just how secure is your client’s wifi–or your home wifi? Find out with aircrack-ng.  This wifi security auditing tool is free/libre, but the Pringles can you’ll have to acquire on your own. (We hear the darknet market at 7-11 can give you one on the down low.) Cracking wifi today is often possible because of poor configuration, bad passwords, or outdated encryption protocols. Aircrack-ng is the go-to choice for many–with or without a Pringles “cantenna”.

Pringles Cantenna is here

Bookmark
ClosePlease login

How To Make a Wi-Fi Antenna Out Of a Pringles Can 1.0

1
image
image

DIY solutions to extending Wi-Fi have existed for as long as Wi-Fi itself has. Ingenious internet users have been using everything from kitchen foil and food strainers, to home made Yagi style antennas to boost their Wi-Fi ranges. While there are many ways you can fine tune your home Wi-Fi system without building additional hardware, there are simple DIY solutions that can also make a real difference to your surfing experience.

Before you start though, make sure you have checked whether you have any other problems with your Wi-Fi connection.

Today we will be building a cheap waveguide Wi-Fi extender, using the simplest design possible.

Why would you want to make something like this? Many people use them to extend their Wi-Fi signal to a hard to reach part of the home, or even extend their Wi-Fi to the bottom of the garden. They can also be very useful to people who rely on public internet access. If set up correctly you could connect to a public Wi-Fi hotspot from much further afield than usual. Perfect for when your own internet goes out and you want to be able to keep surfing in your slippers!

While there are many variations on this type of build, today we are striving for a balance of price and simplicity. This guide should help you quickly build your own range boosting Wi-Fi cantenna.

One of the most popular variations of this practice is known as the Pringles can antenna, or cantenna for short, which utilizes both a waveguide ‘probe’ design and a Yagi style antenna to boost signal pickup from your computer, or boost the range of your router.

While these antennas were an amazing feat of DIY engineering for their time, they had a few fundamental flaws. The general consensus is that a can with an inside diameter of between 76mm and 101mm work best, with 92mm being the sweet spot. Clocking it at an inside diameter of 72mm, a the Pringles can is too thin. For it to be effective it would have to be well over a meter long. Also, there are conflicting opinions as to whether the Yagi collector design is any more effective than a well proportioned waveguide design.

By switching the type of can we use, we will create a waveguide antenna that will outperform the Pringles can, and also requires much less work to make.

You Will Need

  • A metal can – as close to 92mm diameter and 147mm tall as possible, though variations can work!
  • Female N type connector – available at many electronics stores, or on Amazon
  • Small piece of 12 gauge (around 2mm thick) copper wire to use as the aerial probe – I salvaged some out of an old plug socket.
  • A female RP-SMA to male N type connector – also known as a ‘Pigtail’ connector. While is is possible to make these yourself, many companies provide these pre-made. I found mine at a local hobby electronics store, but they are also available on Amazon.
  • A USB Wi-Fi adapter with removable aerial – anything like this will work fine, so long as the aerial can be removed.
  • A soldering iron and small amount of solder
  • Wire cutters
  • A file to file down sharp edges
  • A drill to make a hole in the can – preferably with a stepping bit.

Choosing Your Can

The first decision to make is which kind of can to use. The size of our choice is important, as there are set fundamental dimensions which allow the cantenna to work. Look out for cans with a 92mm diameter that are around 147mm in length, though you may find something exactly of that size hard to find!

Time to head to the shops with a tape measure and see what you can turn up.

You can use this tool to calculate whether the cans you have collected would be effective. The important part to pay attention to once you have the calculations for your diameter is the inside length. The closer you get to the dimensions from the calculator, the better your cantenna will function.

I found that a coffee can (diameter 88mm), and a large food can (101mm), were closest to the right size. The coffee can was a little short on length, but the 2cm it is lacking is still quite the difference from the 26cm of length the Pringles can falls short on. The food can came up to almost perfect dimensions, though the edges are ridged, which will impact its performance.

I decided to make both cans into cantennas – this guide covers the construction of the coffee can, though the construction is exactly the same for both, just with different spacing as per the calculating tool above.

Making The Probe

The probe is the small piece of copper wire which will stick out into the middle of our can. We will be attaching this probe to the female N type connector using our soldering iron. Using the same tool as above, we can see that for my coffee can’s diameter we need a probe length of 30.7mm.

I would advise cutting a slightly large piece of wire to begin with, and soldering it into place inside the brass socket on the top of the connector.

The length of this probe is very important – and you need to be sure to measure from the bottom of the brass connector to the where the tip of the probe will be. Even a millimeter off here and your Cantenna may not work as well as it could!

Measure carefully to the length specified in your calculations, and cut the probe to the correct length.

Making Holes

Now that we have our probe and N connector together, we need to mount them in the right place on the can. For the coffee can’s diameter, we need our probe to be placed exactly 53.3 mm from the bottom of the can. Once again, this has to be as precise as possible, so take your time!

It is also worth noting that this measurement is to be taken from the base of the can, not the ridge around the bottom.

Once you have your precise measurement it is time to cut the hole. I used a drill followed by an angle grinder on my rotary tool – which was fiddly to say the least! Just to test I also made one using only a screwdriver to punch a hole, and a pair of needle nosed pliers to slowly bend it outwards until it was the correct diameter. Neither of these methods are ideal, and I would recommend using a stepping drill bit to make this part easier. Remember: you are cutting metal, and metal is harder than eyes, so maybe wear something to cover them.

Whichever method you use, measure the diameter of your N type connector with the nut removed, and make a hole slightly bigger, so that the N connector can slide in. I found that making a slightly too small hole which I then widened using a file worked well. I would also recommend filing down any sharp edges at the top of your can at this point as you’ll be needing to stick your hand in there to tighten it.

You should now be able to fit the connector, by pushing it through and attaching the nut from the inside. Be careful whilst doing this! I managed to cut my hand twice on the inside rim of the coffee can. I guess someone forgot to take his own advice with the filing.

Putting It All Together

Now that the can itself is finished, we need a way to attach it to our computer or router to reap the benefits.

To attach it to a computer, insert the UBS Wi-Fi adapter, and install it’s driver software. Once that is done, remove the aerial that comes with the adapter by unscrewing it, and attach the smaller end of your pigtail connector instead. Attach the other end of the pigtail to the protruding N type connector.

That’s it! You are done!

To test it out, take your computer to a place where your Wi-Fi signal is usually very low, and point the cantenna in the direction your Wi-Fi signal comes from. Where possible, a clear line of sight is best, though I found there to be a significant signal boost even pointing it through the thick walls of the old apartment building I live in. You will need to make sure you are using your Wi-Fi adapter – which you can change in Network and Sharing Center -> Adapter Settings.

You may find that you get a better signal with the probe pointing sideways rather than straight up – if you can see the aerials on the router you are connecting to, try to mimic their orientation for the best results.

Many people connect their cantennas to tripods in order to get the best control over direction and orientation, in this case a little Macgyvering with zip ties and an old plastic plant pot did the job perfectly!

I tested both the coffee and food can designs, and both boosted my Wi-Fi significantly. Gergory Rehm of Turnpoint.net took part in a “Homebrew antenna shootout” testing different designs, see the results here!

I used a free piece of software called Homedale to measure the strength of the Wi-Fi signals I was receiving, in both cases you can see the cantennas (blue line going off the top of the graph) gave a significantly higher signal when compared with the internal Wi-Fi receiver of the laptop (yellow line). The readouts from the adapter listing page in the software show an average of around a 20dBm boost.

While the coffee can cantenna is still not optimally sized, it performs well as a performance booster, and with the food can performing well in close quarters too, I am looking forward to testing these over a greater range.

In many situations this will be the difference between intermittent, close to unusable internet and a stable usable connection. If you need to extend the distance between your computer and the cantenna, I would recommend using a USB extension cable.

Connecting To A Router

Another approach to take is to connect the cantenna to your router to boost the signal from the source. By pointing a transmitting cantenna from your router to a receiving cantenna at your computer, you will be able to boost your range significantly.

This is perfect if you want to direct your Wi-Fi signal to an outbuilding, or to give your garden full coverage. You could even use it to share your connection with a nearby house if you are feeling neighborly! It is worth noting however, that this boost will be directional depending on the orientation of the can, and while it will help hugely in one direction, it may limit the strength of the signal in other areas.

Many routers have aerials attached to them which will fit our pigtail’s RP-SMA side, though you may find you will need to update your routers firmware to get the most use out of this by boosting the signal it provides. It is worth doing this regardless however, as you can expect to see great performance increases from this upgrade alone. For a guide on how to supercharge your router, see this detailed guide.

You may find your router has no RP-SMA connector. If this is the case you have two options.

Firstly, you can try to add one yourself. YouTube user Mix Bag has a video taking us through adding a connector to his stock Virgin Media Super Hub.

This method is a little involved, and may vary from router to router. If this seems like something a little out of scope, another incredibly simple way to boost your Wi-Fi signal is to create a parabolic reflector to place behind it and focus the signal.

There are many variations of this, but Instructables user MarkYu has a quick and simple guide to building one – the only change you would need to make to the build is to stand the reflector behind your aerial-less router.

While there are many approaches to improving Wi-Fi range, these builds are a quick and simple way to improve it without breaking the bank.

Have you built a Cantenna in the past? Have you come up with your own crazy designs for boosting your Wi-Fi signals? Let us know in the comment section below!

Bookmark
ClosePlease login

Kali Linux explained: A pentester’s toolkit for beginners and vets alike.

0
kali linode
Why it’s the most popular penetration testing Linux distro.

Kali Linux definition

Kali Linux is the world’s most popular offensive-security-optimized Linux distro. Maintained and managed by the fine folks at Offensive Security, Kali was born in 2006 as BackTrack Linux, but after a major refactoring in 2013 got the name Kali. What does the name mean? Well, we’ll get to it.

Based on Debian Testing, Kali includes more than 300 security tools, including the big ones like Metasploit, Nmap, and Aircrack-ng, but also a wide variety of more obscure and specialist tools.

Kali is free to download and use but is intended as a specialized Linux distro optimized for penetration testing and not as a day-to-day operating system for checking your email or web browsing or sharing cat gifs on the Book of Faces.

Getting started with Kali

If you’re familiar with Linux, especially a Debian flavor like Ubuntu (or, well, Debian) then Kali will seem familiar to you, at least at first. Crack open a terminal and poke around. It’s officially recognized as a compliant Debian variant by the Debian Project, and with a default GNOME desktop, looks and feels at first glance like you might expect.

Fast forward to that scene in a World War II movie where a grizzled, cigar-chomping sergeant removes the dusty tarp covering the Big Guns. That’s approximately what it feels like to pick up Kali and start playing around with it. Especially since pointing most of these tools at targets without their permission is illegal under the Computer Fraud and Abuse Act (CFAA) in the US and under similar laws around the world, you might feel a little like a baby with a howitzer. Aim wisely.

Again, Kali is not meant for use as a daily default operating system, but for security testing. As such, it is frequently installed as a virtual machine on a laptop, using VMWare or VirtualBox on a Windows, Mac, or even Linux host. Kali also installs nicely as a Qubes VM. If you’re new to Kali, download a preconfigured VMWare or VirtualBox VM to get up and running quickly.

Who is Kali for?

Kali is a specialized Linux distro that is meant for experienced Linux users who need an offensive security-focused penetration testing platform. If that does not describe you or your use case, then give the user-friendly Ubuntu or Mint Linux distributions a go instead.

The Kali maintainers don’t mince words:

“If you are unfamiliar with Linux generally, if you do not have at least a basic level of competence in administering a system, if you are looking for a Linux distribution to use as a learning tool to get to know your way around Linux, or if you want a distro that you can use as a general purpose desktop installation, Kali Linux is probably not what you are looking for.”

Once inside the bailiwick of penetration testing, Kali is the right choice for most offensive security tasks. Advanced users may surface with opinions on alternatives to Kali they prefer, but newcomers to penetration testing need to get Kali under their belt before looking at other options.

Installing Kali meta-packages

So many security tools are available for Kali that they all can’t fit into one download. Because many of those tools are specialized for specific hardware or edge use cases, Kali downloads with a bundle of the most commonly used tools and allows users to install meta-packages — Debian packages that include dozens, or even hundreds of packages in that category.

The Kali folks give the example of downloading Kali for a wireless pentesting engagement. Rather than waiting for everything and the kitchen sink to install, an apt-get install kali-tools-wireless command will get you all of Kali’s wireless tools, so you’re off to the races faster.

The full list of meta-packages includes more than a dozen options to choose from. New Kali users might best start by installing kali-linux-default and maybe kali-tools-top10. If you want All the Things, then kali-linux-everything is your jam, but be prepared for long download times plus tool overload.

Popular Kali tools

Imagine a Swiss Army knife with several hundred gizmos, gewgaws and whatchamacallits. Where do you start? Probably not the tweezers or toothpick. But you’ll want the large knife, definitely a can opener, a screwdriver — the basics, the reason you bought the knife in the first place.

For Kali, that means Metasploit, the popular penetration testing framework. That means Nmap (of course), the indispensable port scanner. That means Wireshark, the ubiquitous network traffic analyzer. And of course, Aircrack-ng, for testing WiFi security.

There’s more where that came from. Loads more. Want to man-in-the-middle network traffic? There’s mitmproxy and Burp (free version) to choose from. Cracking passwords offline? Hashcat and John the Ripper will do the job. SQL injection fun day? Sqlmap is a good place to start. If you’re crafting phishing emails as part of an engagement, the social engineering tools — like the Social-Engineer Toolkit (SET) — will help you outwit inattentive employees.

Practice using Kali

Newcomers to Kali should find a suitably legal firing range at which to point their new arsenal of tools. Popular services like VulnHub and HacktheBox offer free/cheap VPN access to dozens of vulnerable boxen for you to practice your hacking skills.

When you’re ready, the OSCP awaits. The coveted Offensive Security Certified Professional certification, made and managed by the folks at Offensive Security — who also maintain Kali Linux — offers hands-on training using Kali and a 24-hour exam where students must hack into vulnerable targets in order to pass.

The OSCP is not for the faint of heart. It’s for a good reason their motto is “Try Harder.” If you decide to go for the cert, expect to work for it.

Special Kali features

Kali supports all sorts of useful edge case you might not have even thought of, including ARM support (slice of Raspberry Pi, anyone?), a forensics mode when you need the bits to provably remain unchanged, a “Kali for Android” called NetHunter that looks to be the new big thing, Amazon EC2 AWS images, and even support for braille.

Most of these are advanced use cases a beginner is not likely to need, or even need to know, but the Kali universe is vast and popular. There seems no end in sight to its future growth.

As for the name? Mum’s the word. “Hindu Goddess of time and change? Philippine martial art? Cool word in Swahili? None of the above,” the founders write. “‘Kali’ is simply the name we came up with for our new distribution.”

Bookmark
ClosePlease login

Kali on Android? Install and use Kali Linux on Android without root

0
kali linux in android

Kali Linux on Android – Does it work?

We put it to the test; it works.

Steps to install Kali Linux on Android smartphone without rooting to run command-line hacking and penetration security testing tools.

We generally use the Linux operating system on Desktop or Laptop because on Android it is not stable to use GUI-based Linux OS, however, the command line will be. Yes, we can set up Kali on Android, which is popular and known for its security testing tools.

So, let’s start with the tutorial, and yes you don’t need to do any modification in your Android OS that would temper the warranty of your phone.

Download UserLand App

Although if you go on the Kali official website, the developers recommend using an Android app called “Linux Deploy“. Indeed that has better performance and access, however, for using it your phone should not only rooted but also you have to purchase the Kali Images available in the app to install and use on Android OS.

Therefore, here we are going to use a free solution called UserLand, this app is available on the Google Play store to download. Here is the link.

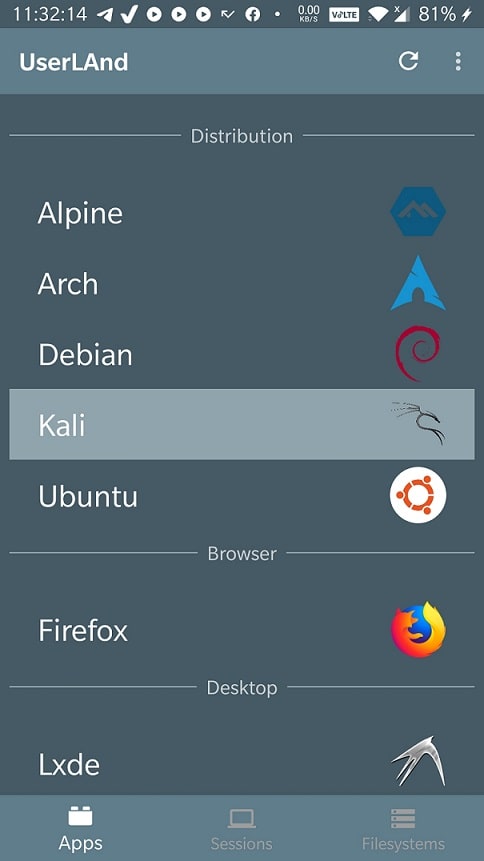
The good thing is, apart from Kali Linux, it also allows the user to download and use pre-configured Ubuntu, Arch, Debian, and Alpine Linux images.

Install Kali on Android

Now, open the UserLAnd and tap on the Kali option.  Apart from that, you can also try other available images.

Install Kali on Android min

Setup Username and Password

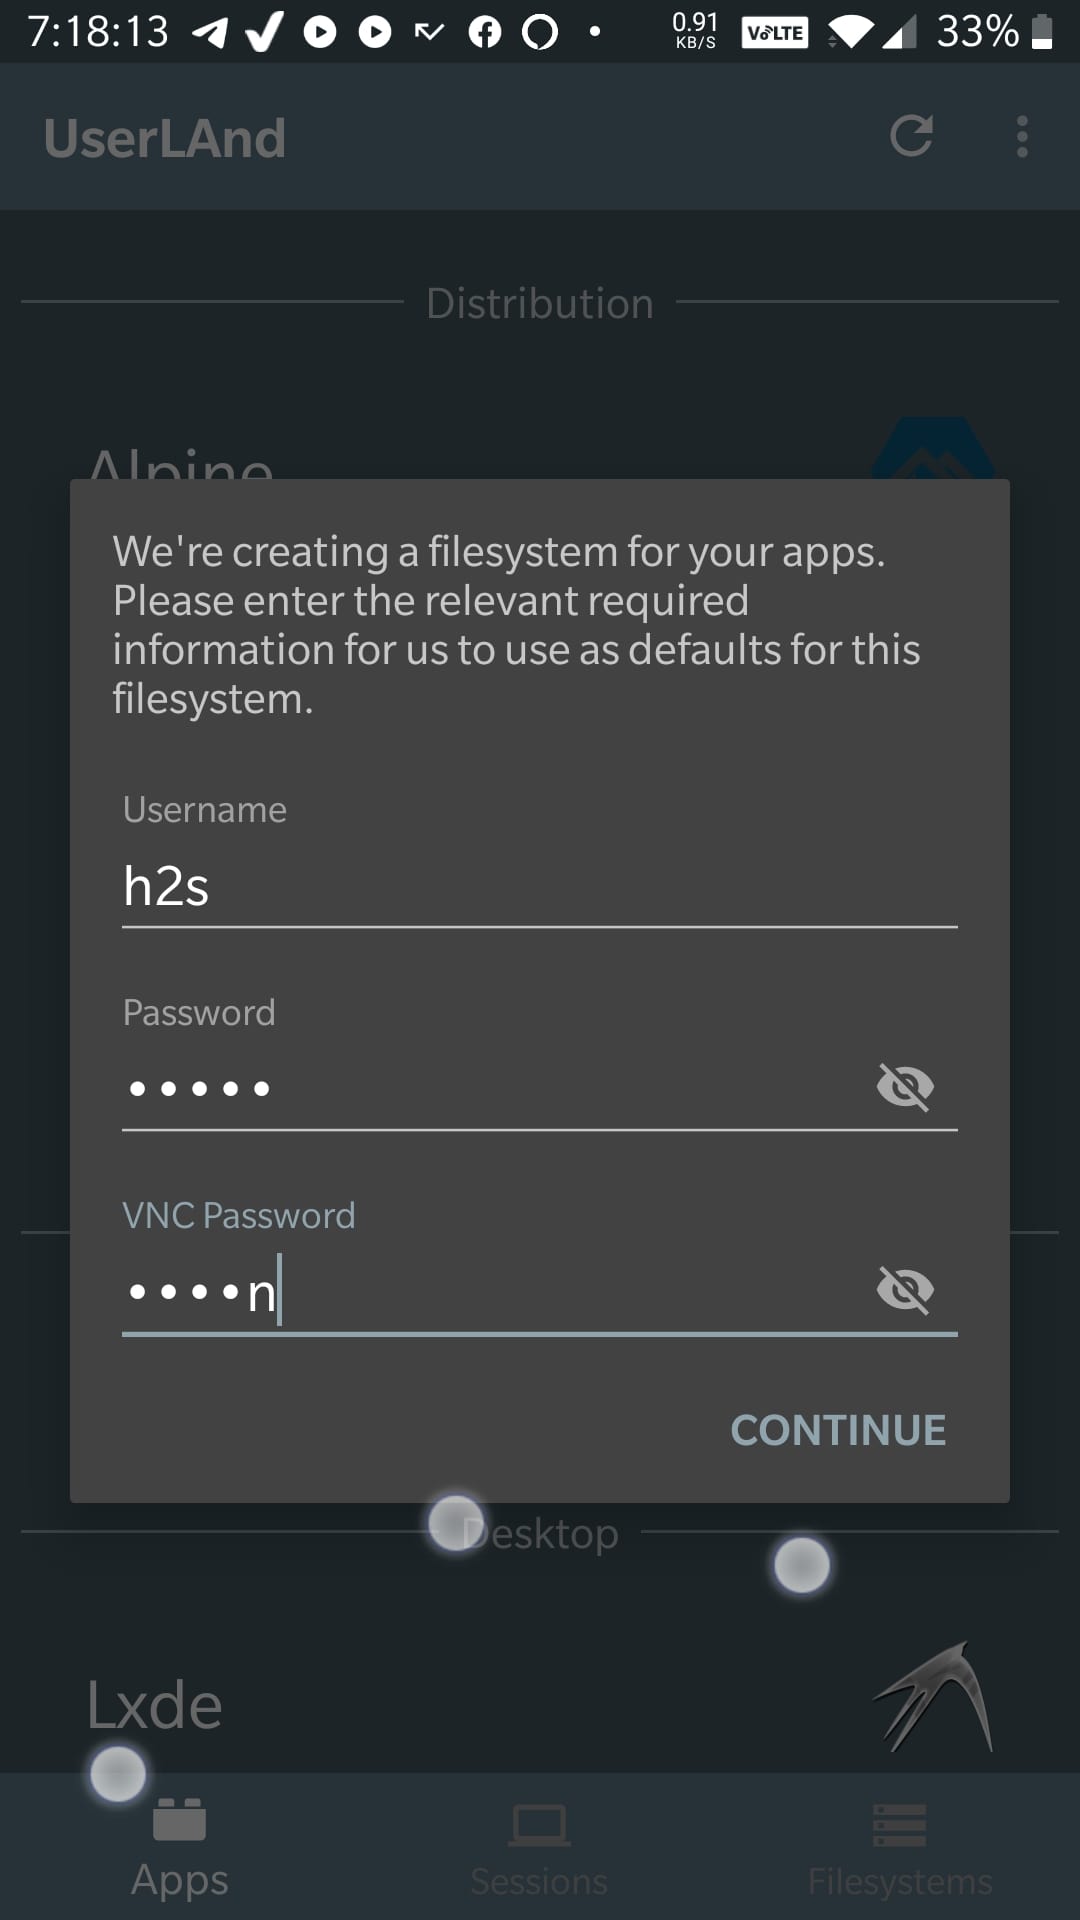
Before setting up further, the app will ask you to set the username and password for the Kali base Image including the password for the VNC server.

Create Filesysem usernam and password min

Select the Connection Method

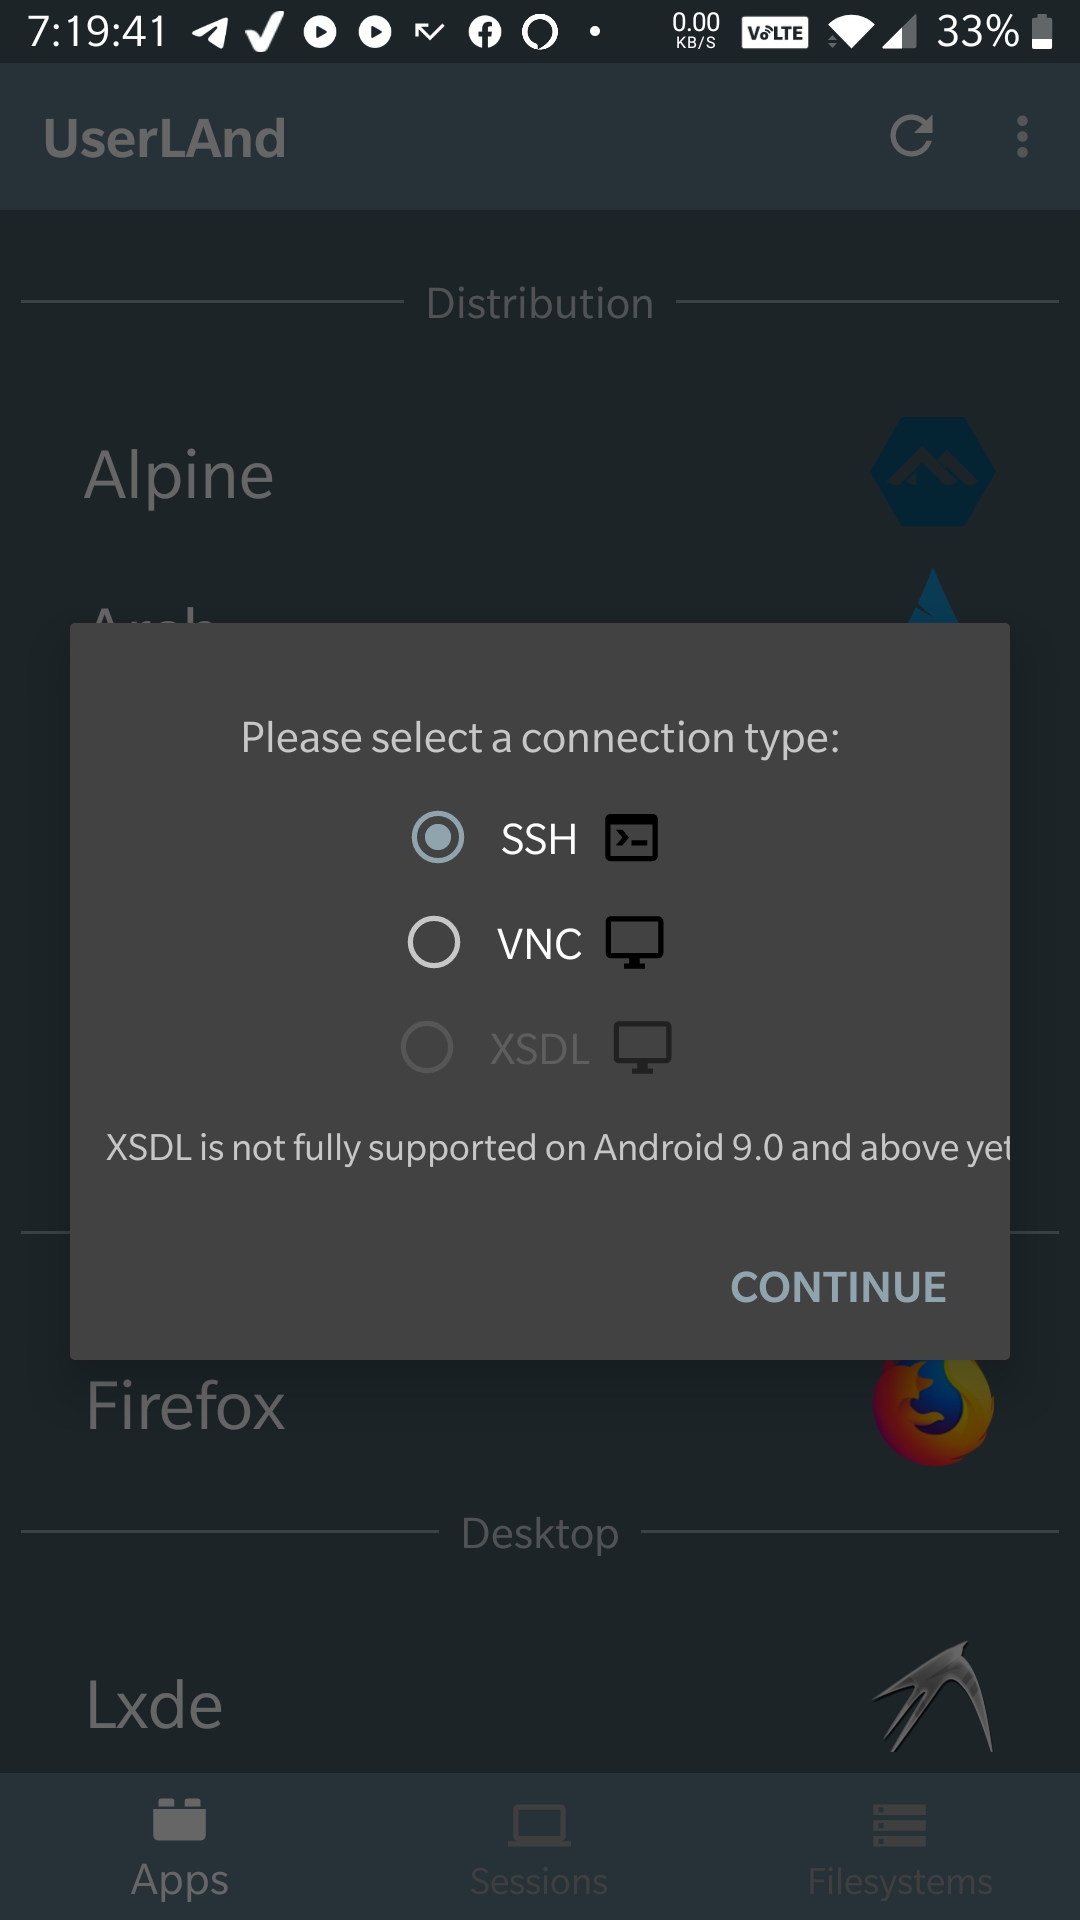
We can connect the installed kali using SSH or VNC, thus while setting up the image the UserLAnd app will aks you to choose the default method to connect the Kali. Select SSH. You can change it to VNC later from the session tab but that doesn’t work properly.

Select the method to connect Android

Access Kali SSH Session

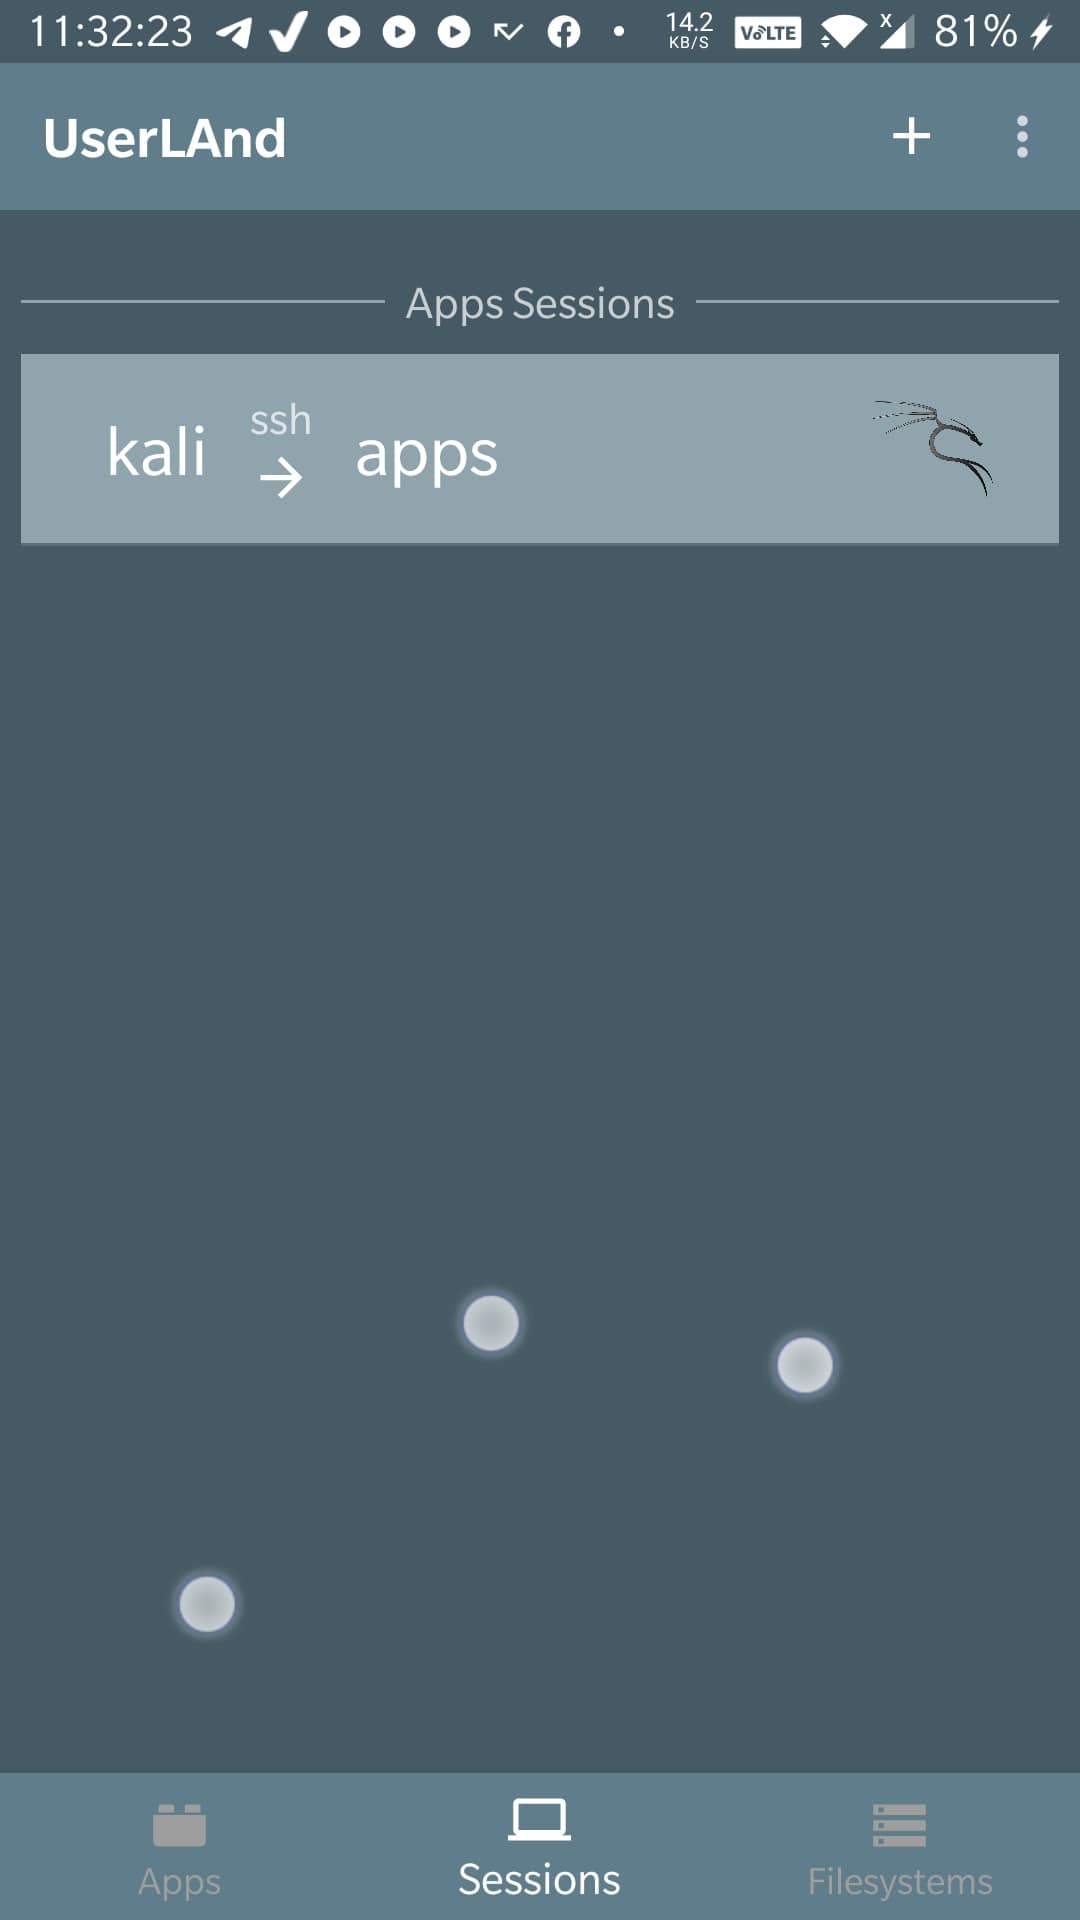
After installing and setting up the Kali, tap on the Session Tab and then the create Kali app session. If you want to change the SSH session to VNC, then tap & hold the Kali app session and select the Edit option. After changing to VNC, it will ask you to download another app to view the GUI session.

Session min

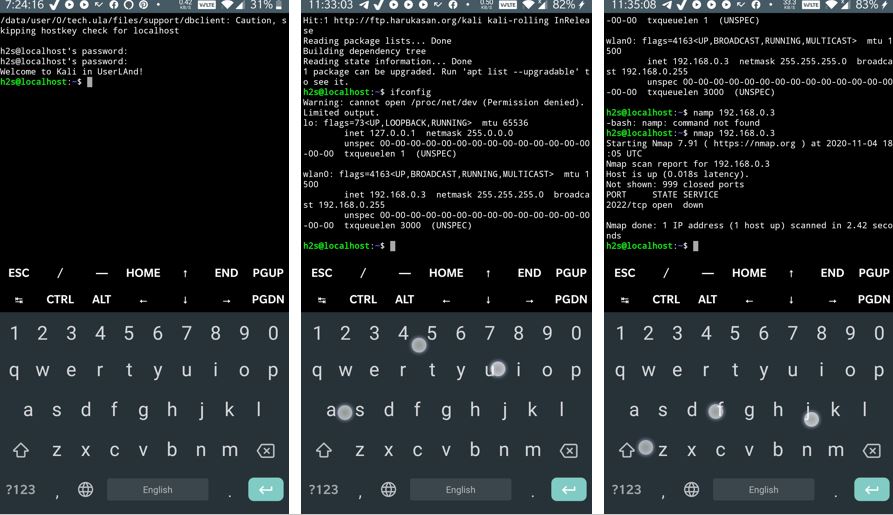
Start Command Line

Now, you will see the command terminal window connected to Kali using the SSH method. Login with the password you have created and start playing around with Debian or Kali commands.

Kali Linux command line on Android

Ending note

Yes, as we are using Kali on Android without rooting the device, thus restriction would be there. Therefore, just try it out to find out what possibilities you can discover.

Bookmark
ClosePlease login

What is AppSec? A process and tools for securing software

0
Cybersecurity

This Content Is Only For Subscribers

Please subscribe to unlock this content.