hardening vps security
Table of Contents
A VPS server is a great hosting option if you want more control over your server without dishing out large amounts of cash for a dedicated server. There are two operating system options to choose from. You can either go with a Windows-based server or a Linux-based server. In this article, we will cover Windows Virtual Private Server security.
After purchasing your Windows VPS hosting and receiving your VPS login details, security is the next best move. Today, we tap in on a few tips on securing your Windows VPS.
One of the most important matters which worries people while using a virtual server is security. Here we will try to present some useful tips to improve the overall security of a Windows virtual server.
Steps to Hardening a Windows VPS Security
We, CyberSecurity experts often get asked, how to secure a VPS. So without further ado, here it is.
1. Disable Default Administrator Account. Then, Create A New User With Admin Permissions.
Your Windows VPS hosting provider installs the OS and creates a default administrator account. This is quite usual and typical. The drawback is that your account can easily be attacked. The attack is usually by bots trying to login with brute-force. Also, there are some automated attacks that can follow suit.
Well, this is easy and simple to prevent. You just have to disable the default administrator account. And then, create a new user with full administrative privileges. Some enthusiast VPS administrators change their usernames to “admin,” which is as bad as leaving it unchanged. Hence, you should create a new administrator account with random letters.
Firstly, you should create a new account. Set a secure, long password. Add the new account to the administrator group
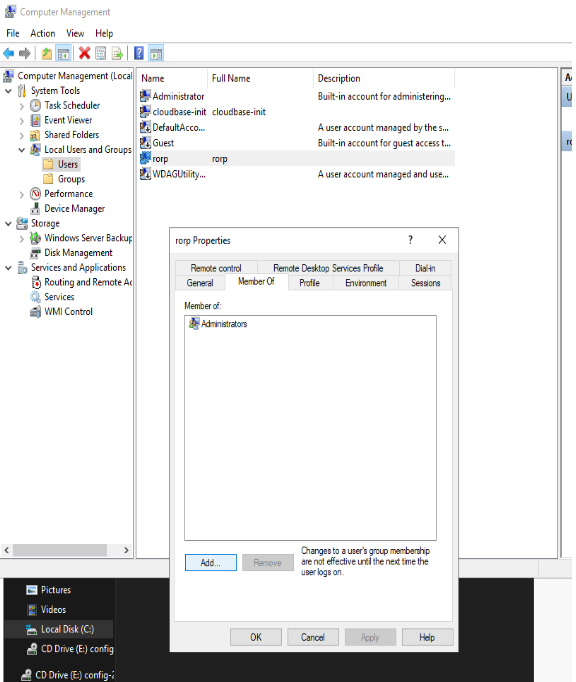
Now that we have created a new account, go ahead and disable the administrator account. Head to the properties of the Administrator user, and tick the “Account is disabled” Box
Why disable the local Administrator account?
The built-in Administrator is basically a setup and disaster recovery account. You should use it during setup and to join the machine to the domain. The built-in administrator account has a specific and well-known security identifier, and some attacks target that particular SID. Renaming the account doesn’t help, because the SID will stay the same. Therefore, Microsoft leaves the administrator account disabled and expects you to create a new one.
Disabling the default admin account further adds a bit of security in that if someone wants to take the account over, they can’t just brute force their way in with it being disabled. They have to figure out which account is an admin and break in that way.
2. Use a Strong, Long, Unique Password
Creating a strong, unique password is the first line of defence in preventing unauthorized access to your vps. One of the easiest ways for criminals to hack into your accounts and steal personal and financial information is to guess passwords. If they can successfully crack the password for just one of your accounts, there’s a good chance they can hack multiple accounts using the same details.
A strong password should be between 8-15 characters long, a mix of uppercase and lowercase letters and include numbers or symbols. For extra security, a passphrase can be created which is a password composed of a sentence or combination of words. The first letter of each word will form the basis of the password and letters can be substituted with numbers and symbols to make it more difficult to crack.
Here we will give an example of bad versus good passwords.
Realinfosec100 – BAD
Realinfosec123 BAD
LondonJohn100 BAD
Re4linf0s3C()()%!%100$! GOOD
R34linf0s3C!%!123!$% GOOD
L0Nd0n$John!1$0%0!% GOOD
3. Lockdown Remote Desktop Protocol (RDP) Ports

Reduce your footprint, lockdown access to Windows Remote Desktop(RDP) to specific IP’s like your home or office (Note that you will need a dedicated IP to utilize this feature) and change the default listening port from 3389 to a five-digit, long, randomly picked number. These settings can be changed through the Advanced Windows Firewall options.
The next on our list follows the preceding step. So, you have to change the default port for Remote Desktop before restricting unknown IP addresses to gain access to your VPS. You only need an Internet connection with a static IP address to meet this.
Standard home DSL, Cable, and Wireless connections do not have a static IP address. Note that most home connections do not have a static IP address whatsoever.
Lastly, restricting IP addresses requires care. You can unknowingly lock yourself out.
4. Windows BitLocker Drive Encryption
Windows BitLocker Drive Encryption secures the operating system booting process and prevents unauthorized data mining. BitLocker Drive Encryption works even when the server is not powered on! It’s a very effective anti-hacking tool against malware.
Installing BitLocker
To install BitLocker using Server Manager
- Open Server Manager by selecting the Server Manager icon or running servermanager.exe.
- Select Manage from the Server Manager Navigation bar and select Add Roles and Features to start the Add Roles and Features Wizard.
- With the Add Roles and Features Wizard open, select Next at the Before you begin pane (if shown).
- Select Role-based or feature-based installation on the Installation type pane of the Add Roles and Features Wizard pane and select Next to continue.
- Select the Select a server from the server pool option in the Server Selection pane and confirm the server for the BitLocker feature install.
- Server roles and features install using the same wizard in Server Manager. Select Next on the Server Roles pane of the Add Roles and Features wizard to proceed to the Features pane.
- Select the check box next to BitLocker Drive Encryption within the Features pane of the Add Roles and Features Wizard. The wizard will show the additional management features available for BitLocker. If you do not want to install these features, deselect the Include management tools option and select Add Features. Once optional features selection is complete, select Next to proceed in the wizard.Note: The Enhanced Storage feature is a required feature for enabling BitLocker. This feature enables support for Encrypted Hard Drives on capable systems.
- Select Install on the Confirmation pane of the Add Roles and Features Wizard to begin BitLocker feature installation. The BitLocker feature requires a restart to complete. Selecting the Restart the destination server automatically if required option in the Confirmation pane will force a restart of the computer after installation is complete.
- If the Restart the destination server automatically if required check box is not selected, the Results pane of the Add Roles and Features Wizard will display the success or failure of the BitLocker feature installation. If required, a notification of additional action necessary to complete the feature installation, such as the restart of the computer, will be displayed in the results text.
To install BitLocker using Windows PowerShell
Windows PowerShell offers administrators another option for BitLocker feature installation. Windows PowerShell installs features using the servermanager or dism module; however, the servermanager and dism modules do not always share feature name parity. Because of this, it is advisable to confirm the feature or role name prior to installation.
Note: You must restart the server to complete the installation of BitLocker.
Using the servermanager module to install BitLocker
The servermanager Windows PowerShell module can use either the Install-WindowsFeature or Add-WindowsFeature to install the BitLocker feature. The Add-WindowsFeature cmdlet is merely a stub to the Install-WindowsFeature. This example uses the Install-WindowsFeature cmdlet. The feature name for BitLocker in the servermanager module is BitLocker.
By default, installation of features in Windows PowerShell does not include optional sub-features or management tools as part of the install process. This can be seen using the -WhatIf option in Windows PowerShell.PowerShellCopy
Install-WindowsFeature BitLocker -WhatIf
The results of this command show that only the BitLocker Drive Encryption feature installs using this command.
To see what would be installed with the BitLocker feature including all available management tools and sub-features, use the following command:PowerShellCopy
Install-WindowsFeature BitLocker -IncludeAllSubFeature -IncludeManagementTools -WhatIf | fl
The result of this command displays the following list of all the administration tools for BitLocker that would be installed along with the feature, including tools for use with Active Directory Domain Services (AD DS) and Active Directory Lightweight Directory Services (AD LDS).
- BitLocker Drive Encryption
- BitLocker Drive Encryption Tools
- BitLocker Drive Encryption Administration Utilities
- BitLocker Recovery Password Viewer
- AD DS Snap-Ins and Command-Line Tools
- AD DS Tools
- AD DS and AD LDS Tools
The command to complete a full installation of the BitLocker feature with all available features and then rebooting the server at completion is:PowerShellCopy
Install-WindowsFeature BitLocker -IncludeAllSubFeature -IncludeManagementTools -Restart5. Use AntiVirus Protection

The importance of using an antivirus to secure your server is clear. You can start with the Essentials, a free and robust option by Microsoft. It auto-updates itself with the latest definition. It also offers real-time protection to your server. An antivirus protects you from almost all online security threats which firewall lets through, however combining both is best in securing Windows server.
Antivirus protects you from almost all online security threats — which firewall cannot do. However, combining both is best in securing Windows VPS.
6. Enable and Harden Windows Firewall

Windows Firewall, as default, normally comes with every Windows OS. It does its job well and can contend with expensive firewalls. Below are some of its benefits:
- Prevents hackers and malicious software
- Filters information coming from the Internet according to your settings
Windows Firewall is decent — but lacking when you are running critical operations (such as credit card information processing) on VPS. Windows Firewall is more than enough for basic to intermediate operations. Advanced operations, though, requires more. Opting for a third-party firewall is the only option in such situations.
Our advice is to select “Deny all” as your default policy and carefully enable those you need.
Only open ports that are required to be open as per your specific use.
7. Microsoft Baseline Security Analyzer
Microsoft Safety SMBSA is a free application to determine missing security updates and vulnerable security settings within Windows. It not only provides detailed insights on vulnerable components and settings but also lists possible measures to secure the server.
Additionally, you should utilize Microsoft Safety Scanner on a regular basis. Microsoft Safety Scanner is a scan tool designed to find and remove malware from Windows computers. Simply download it and run a scan to find malware and try to reverse changes made by identified threats.
8. Keep Windows and Other Applications/Services Updated
All code is considered to be PERFECT until its loopholes and backdoors are unidentified, before we know it, they are being exploited in the wild. On this note; when you receive your new VPS, it is recommended that you run Windows updates as soon as possible.
To install important updates automatically, you should turn on automatic updating. Important updates provide benefits such as improved security, vulnerability patches, and bug fixes. Recommended updates are meant to address non-critical problems and enhance computing experience. Recommended updates can also be downloaded and installed automatically.
Optional updates are downloaded and installed at your choice, as you cannot set them to automatic. When you do not turn on automatic updating, make sure that you check for updates regularly.
Update third party software regularly
Microsoft always works really hard to highly secure Windows. Despite the number of OS today, Windows is arguably the safest. Yet, security is often weakened when we install third-party software.
9. Intrusion Prevention/Detection
Setting up an intrusion prevention and detection tool is not for everyone. It is highly advised to hire experts in this field. Better yet, you can contact your Windows VPS hosting provider for more reliable help.
You need to make sure there is a firewall-like software analyzing real-time network traffic to your VPS. Also, attack signatures should be identified by this software.
Snort is arguably the best option for such tasks. It is a widely-used open-source network intrusion prevention tool.
10. Use Spyware Protection
Spyware infects your VPS with ease. Cyber Security Experts often receive complaints about VPS users running a spyware-infected VPS.
First, let’s define spyware. Spyware is software that displays unwanted advertisements on your machine. Spyware mostly collects your information without your permission. Also, it alters your VPS settings without your permission.
Having spyware on your Windows can result in toolbars being installed. Even worse, spyware can alter your default home page, add links and bookmarks, and/or display pop-up ads repeatedly.
That kind of spyware is even better than the “silent” ones. This spyware works silently in the background and collects personal information. These can range from visited websites to search engine keywords and your keystrokes.
So, where can you get spyware? The most likely way is through the Internet. Some free apps you have downloaded and installed are likely the source. In other cases, simply visiting a website can inject spyware into your Windows.
Installing anti-spyware software is the safest protection technique. A typical anti-spyware software alerts you of spyware attacks. You can also scan to detect the spyware and remove it successfully. Lastly, keep your anti-spyware software up-to-date to get the best security.
Zap-Hosting – Windows/Linux Hosting Provider

Finally, how about some serious value for your buck when it comes to VPS hosting? What about Teamspeak hosting? We highly recommend Zap-Hosting for all your Gaming hosting requirements, go check them out.
Read more related CyberSecurity Guides
Read the latest cybersecurity news articles
46,063 total views, 3 views today




2 thoughts on “HARDEN YOUR VPS: Steps to Hardening your VPS Security”